Pages

Tuesday, September 23, 2014

Tatting Inspiration

Are you inspired by other tatters? I am, far too many to talk about in a single post. From antique patterns to modern, online publications to professionally bound books, Etsy shops to blogs...there is so much to look at to gain inspiration. Today's post will be about my venture into tiny tatting, and why I chose to use such small thread on the Stawasz Mega Doily.
Elena Koval's doily (left) next to mine (right)
If you are a member at InTatters and have been following the Stawasz Doily tat-along, then you have probably seen Elena Koval's finished piece, completed a few years ago. She goes by the username monedido, and you can find her blog here: Little Jackdaw's Nest.

Last year, I had been spending a lot of time on eBay looking for rare tatting books. Unexpectedly, I came across a listing for one of Elena's finished doilies (for an extremely low price). I had been admiring her work on InTatters and jumped at the opportunity to own one of her pieces. I knew she tatted using size 80 threads and really wanted to see her work in person.

The pattern is called Buttercups from Ben Fikkert's A Tatting Adventure. Isn't it pretty?
As I worked on other projects, I would occasionally take this piece out to admire the intricacy of Elena's tatting. Small threads seemed off limits to me, but the thought of trying them out was never far away.

In truth, I tried out Lizbeth size 80 on a bookmark, only a few months after learning how to tat. It looked ridiculous in the pattern I chose, but more importantly, I had no idea how to hide the ends. I have never been able to succeed in the magic thread trick, and my sewing needles were too big to fit through the tiny thread. So, I abandoned the thought of tiny tatting for over a year.

That is, until September of last year, when I found another tatter at the Waterford Fair. (Click here for her website). As I was looking through her craft booth, I noticed a piece done in very fine thread. I asked how she hid the ends, and she replied "with quilting needles."

Now, I admit, I know next to nothing about sewing...including needle sizes. I didn't even know there were needles small enough to fit through size 100 thread. So, off I went to the local craft store, new information in tow, and looked through the display of all of the sewing needles to find the smallest ones. Instead of using quilting needles, I decided to pick up a pack of "sharps" because they looked smaller. I went home and tatted samples in Lizbeth size 80 and DMC size 100, and low and behold, the sharps worked! I was ready to begin my tiny tatting adventure.

I began with a series of snowflakes tatted in size 80 DMC tatting thread. Once I got comfortable with this, I decided it was time to go for the size 100. Here's where I am now: my Stawasz Mega Doily next to Elena's doily on a folding chair:
The rounds have gotten long enough that I have to use large Clover tatting shuttles to hold the right amount of thread to finish. These shuttles are great, and I've been meaning to post a review of them on my blog. The little bit of tatting in the upper right section of the doily is there because I decided to change the stitch count. More details on that when I finish the round. Until next time...

Tuesday, September 16, 2014

Fun with drawings

Sometimes it's fun to see what a design element will look like with different points of symmetry. The following images have been drawn individually, using the Kaleidoscope Drawing Pad app on my iPad.

Here is the same idea, done with four, five, six, and eight sides:
Can you see the repeating elements?

Once I have a basic drawing, I will often need to go back and alter portions of it to increase the chance that it will be tat-able. Just glancing at the image above, I can see that the angle of the long outer chains in the square motif would be difficult to maintain. The same might go for the five sided motif. The hexagon would probably be okay to make a simple snowflake. Lastly, the octagon would need to have some alterations to enlarge the outer rings.

Let's look more closely at the octagonal drawing. As points of symmetry increase, the spacing between the outer rings gets smaller, causing them to eventually become scrunched and out of proportion with the inner rings:
To remedy this, I can redraw the motif, extending the chains outward to make the piece larger:
This looks pretty good, but I can still see that the roundness of the outer chains might cause problems. So, I changed the direction of some of the chains to come up with this:
I think that gives a better visual effect overall. Let's add a second round to continue with the theme of lots of rings:
This might make a nice coaster. For now, drawings like this get put into a "Things to Tat" folder on my iPad. I've accumulated quite a few ideas that are waiting to become tatted designs. I will have to wait a while as I am currently putting my efforts into continuing progress on the Stawasz Mega Doily.

Friday, September 12, 2014

The Etsy Experiment

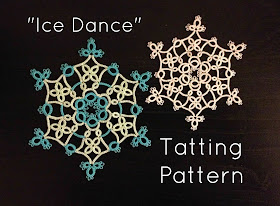
Well, I did it. I took the plunge. Here is my latest tatting pattern, now up in my very first online shop. I hope to add a new pattern every few months.
https://www.etsy.com/listing/203082883/snowflake-tatting-pattern-ice-dance?
Why open a shop? It seems like fun, I can learn something new, and it will help motivate me to create more patterns. As an added bonus, maybe I will sell something and have a small tatting fund. Wouldn't it be neat if someday, I could support my hobby with my hobby? I think it's well within reach considering tatting is so inexpensive! But first I'd need to get more than one pattern in the shop :)

I still want to continue offering free patterns on my blog as well. I'll have to figure out a good balance as I go along. I think December will be the perfect time to offer a free Holiday snowflake pattern. I have some sketches drawn up waiting to be transformed into tatting. But now that I've taken a good long break from the Stawasz Doily, I really must get back to it!

Friday, September 5, 2014

Snowflake in White

I like to tat snowflakes in white because they look good against a Christmas tree. I also like using DMC Cordonnet Special, which comes in white and ecru only. If you are like me and prefer a more traditional snowflake, here's the piece from my previous post, this time in white:
(The pattern for this snowflake can now be found in my Etsy shop)

I forgot how long it takes to make a design. All the diagramming, testing, and retesting, not to mention my desire to tat multiple final versions to see what different colors or slightly different stitch counts will look like. In the end, it's still a lot of fun and provides great exercise for the brain!

I've decided that I'd like to tat this again in blue, to have something that is easy to scan for the pattern diagram. I have been using white snowflakes for the images in my free patterns, but that requires scanning against a colored background which in turn wastes printer ink for those who want to print out the pattern. I think making a blue snowflake will help with that as I can scan it on the standard white background.

I also noticed a very slight cupping, and I can't help but adjust the stitch count a tiny bit more, even though it won't make too much of a difference in the end. It's in my nature to be very particular about these kinds of things :)

Tuesday, September 2, 2014

I got bored...

I got tired of working on the Stawasz doily and I needed something to wake up my brain. Designing is good for that, and I tend to tat a lot faster and for longer periods of time when I have something to create from scratch. There are a few drawings I've had saved to my iPad for months, with the intention of turning them into patterns. One of the drawings was a snowflake, and here is the end result:
(The pattern for this snowflake can now be found in my Etsy shop)

It's tatted in two colors to help me with the diagramming process. I like to diagram all shuttle 1 work in red and shuttle 2 work in blue. Usually it's pretty straight forward, but when there are a few unusual twists it can be hard to remember which shuttle does what. I'm thinking of setting this pattern aside and starting a pattern shop on Etsy. I have a lot of fun making designs and do want to continue offering a combination of free patterns and sale patterns in the future.

This is the original drawing that the pattern is based off of, created with the Kaleidoscope Drawing Pad app:
I was a bit intimidated by the drawing because it looked like it would be difficult to get it to lay flat. I was pleasantly surprised, however, as it only took three attempts to get the correct stitch count.

Attempt 1, I played with the stitch count looking for something that would work:

Attempt 2, I thought I had a good stitch count, but it was still cupping slightly. Also, the proportions were not representative of the original drawing:
Attempt 3, I expected to have a lot more work to do, so I sloppily cut and tied all the ends. This time, everything worked out. I wish I had treated it like a final copy:
I'm also working on a final version in white. After that I have to create a diagram and figure out this whole Etsy thing. That should keep me busy for a few weeks :)