When it comes to tatting, I am an absolute visual learner. I can follow diagrams with ease, but give me a written pattern and I don't know how to make heads or tails of it.
It naturally follows that to adapt a pattern, I need some kind of visual reference. Any computer program that has copy, paste, crop, resize, and rotate will do (though I tend to use various Apps on my iPad, because my laptop is usually tucked away in a closet.)
The Priscilla bookmark, for example, started as an edging from the Priscilla Tatting Book #2:
I wanted to see how the pattern would look if I turned it the other way around, so I took a photo of the pattern and cropped it:
I used two copies of the photo, making sure to rotate one of them so I could splice them together:
This gave me a basic idea of how the bookmark would look, though it still needed a corner. To do so, I used a third copy of the image and spliced it onto the end:
I tried pulling the corner out a little more, but found that it looked best as it is pictured above.
Figuring out the stitch count for the corner required only minor adjustments to the chains. However, as is the case with many vintage patterns, this one needed a bit of tweaking to get it to lay flat. I tatted a small sample to test out the corner and to adjust the stitch count:
From this, the final pattern was constructed:
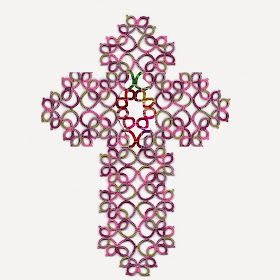
At the beginning of the year, mb duke made a blog post and asked if the bookmark pattern could be converted into a cross. I believe the answer is yes, and that it would be fairly easy to do. Using the same concepts above, I can splice four images of the bookmark together to create a cross:
A bit of adaptation is needed to get the pattern to flow continuously, so I used an App on my iPad to draw over the center portion in white. I also began to draw connecting chains:
From this point, one can add their own ideas of how to stabilize the central part of the cross. I chose floating rings, which I drew on my iPad (please excuse the poor drawing quality!)
I don't have a finished version of this, but I am really confident that the idea would work. All that is needed is to estimate the stitch counts for the inner chains and floating rings. The rest of the stitch counts are already provided in the bookmark pattern itself. This is something that I have added to my ever growing "To Do" list, and if I ever complete it, I will add it to the free patterns section of my blog.


I like your idea of splicing together images, but I'm not sure I have the dexterity to do it on an iPad!
ReplyDeleteGreat designing - but what a lot of figuring out! It would take me forever and a day to get the stitches counted out. Kudos to you!
ReplyDeleteSuperb ! I have done this with some of my line drawings & the magic square series. But definitely not to this level of designing ! I love the way to handle & use software & technology :-)
ReplyDeleteThanks for sharing. I will definitely adapt it for myself in future forays .
Your method is very interesting and useful if you want to have multiple motif repeats in the same pattern.
ReplyDeleteI'm sure you will eventually get the cross done as well, it would be very pretty.
Gosh.
ReplyDeleteBrilliant how you matched up the pattern, I love the bookmark and the cross,
ReplyDeleteLooking firward to your pattern
Margaret
Very interesting post. There are many treasures to be found in the old patterns.
ReplyDeleteI love it I do this, but just draw it out, may take less time the way you are going about it :)
ReplyDeleteHey I just posted your snowflake on my blog except made with different size thread by accident came out pretty good though check it out!
So lovely and what a great idea! I came up with a bookmark pattern from the same original but connected on the other side. Interesting how different they look!
ReplyDeletehttps://docs.google.com/document/d/1Ff92tqha_6XR4zGGYRFHctzsG-HLA4HG5JySbVGOAyI/edit?usp=sharing
Very pretty! What a great idea to use rings in each of the four corners to give a balanced look to the bookmark. Do you have a blog? I'm sure many would be interested in tatting this.
Delete