Custom Pages

Wednesday, June 25, 2014

I found one!

Earlier this year, I put together a simple floral edging and bookmark pattern, which I shared on my Free Patterns page. Some of you may recall that I had been looking through my vintage tatting books for a similar pattern, just to make sure that I hadn't accidentally copied someone else's design. I was sure I would find something that looked identical to what I had created, but try as I might, I could not find anything!

Well, about a week ago, as I was looking through my pattern books for something to tat, I stumbled upon the edging I had been looking for. I found it in Angeline Crichlow's Let's Tat:

The reason I could not find this pattern before is because I only recently acquired the book for my birthday. I consider myself lucky as I have only seen two copies of Let's Tat available, once per year on eBay.

When I saw the pattern, I just had to try it out. Below is a scan of three samples:


The top is from my floral edging pattern. The middle is a modified version of the edging from Let's Tat, to correct for inconsistencies between the written pattern and the photo. The bottom is the pattern from Let's Tat, tatted verbatim from the written instructions.

After I tatted the three samples, I realized that my edging doesn't look very much like the one from Angeline's book. As you can see, there's an enormous size difference between them. It was rather difficult to tat the rings in her edging because they are so large. Though, I do like the shape of the large rings better...they are more flowery and less boxy than mine. Perhaps I can revisit this later and adjust some of my stitch counts to create a motif that lies somewhere in between.

Thursday, June 19, 2014

Practicing Techniques

Over the past couple of months, I have drawn a few designs that I would really like to turn into tatting. There is only one problem: I am not proficient in the techniques I would need to use to make that happen. So, this week, I decided to go through my tatting books to see if I could find patterns that I could use for practice.

It didn't take me long to find the perfect book: Tatting Patterns by Lyn Morton. This had all of the techniques I was looking to brush up on: sideways facing rings, chains joined to each other, directional changes, and climbing out from one round to the next.


The first motif, "Rosie," is very simple and good practice for sideways facing rings, as well as for joining the last chain back to the first. I didn't load enough thread onto my shuttles, so I only completed five repeats:


I like Lyn's technique of placing a small picot before beginning the first chain, so that you have something to join back to at the end. I didn't even know that you could make a picot before the first stitch of a chain. This is definitely something I will be using in the future.

The next motif, "Hearts and Flowers," is a bit larger, and also has sideways facing rings. I saw this and wanted to use it to practice connecting chains along a straight line. I had to make sure to keep my tension loose so that my chains did not curve too much:


After this, I decided to try out "Margaret" to practice changing directions while tatting. The directional changes occur in Round 2, to make each of the flowers. There weren't many instructions on how to to this, so I had to figure it out by myself. It wasn't too bad, I just had to remember not to reverse my tatting and to use the shoelace trick before each center ring. As an added bonus, I discovered that the shoelace trick makes enough of a gap to be used as a place for joining.


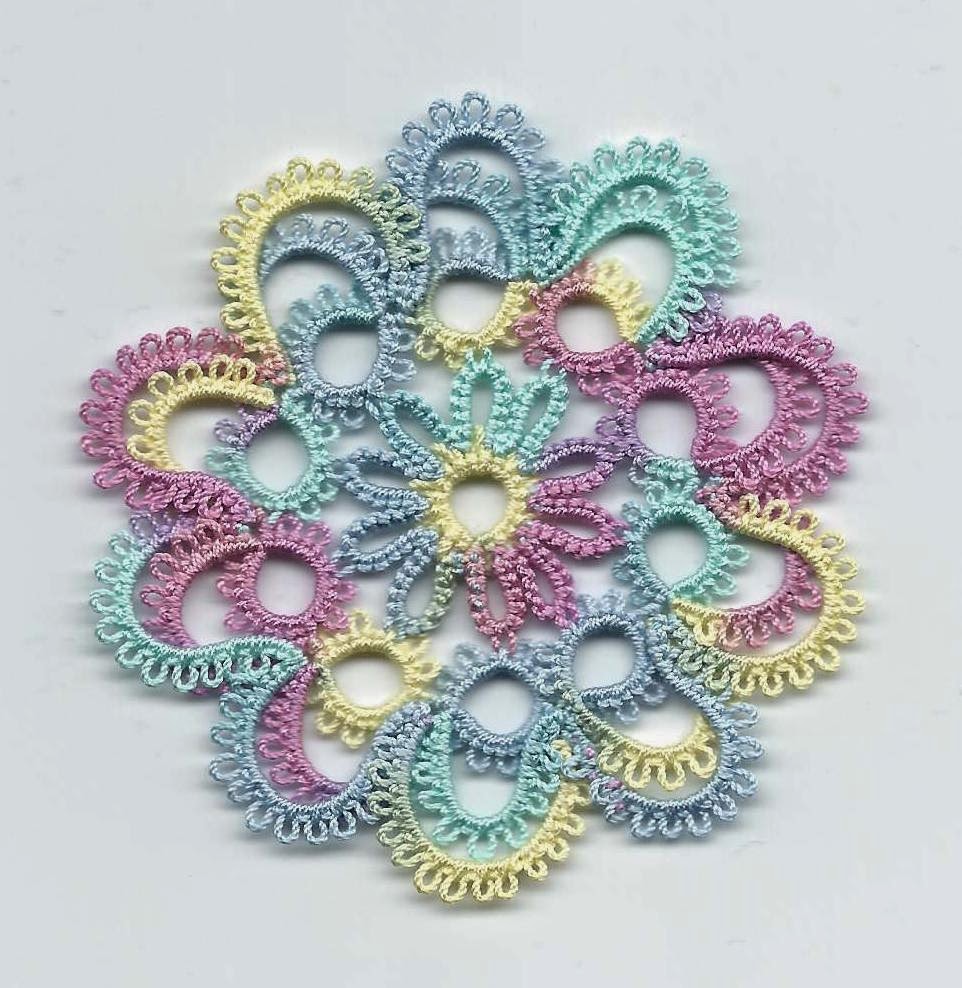
Lastly, I tatted the "Flat Flower Motif" which utilizes sideways facing rings and climbing out to another round. The spaces between the rings and chains make a good join location for the last round, so no extra picots needed here. I blocked this one very crudely by smashing it down with a wet paper towel and letting it dry on a paper plate. I have a blocking board and rust proof pins, but rarely have the patience to use them :)


All in all, tatting motifs from a book is much easier than designing, but I also find it to be more boring and less fulfilling. I wonder how long I will continue tatting from books before I become tempted by the thought of making a new design...

Saturday, June 14, 2014

Printable pattern, and a new page for the design tutorial

Just a quick post to let everyone know that I've uploaded a printable diagram of the snowflake from my iPad design tutorial. I made mention of it at the end of yesterday's post, but wanted to write it here as well, for people who have not read to the end of the tutorial.


You can access the pattern through my Free Patterns page, or go directly to it by Clicking Here.

I've also created a page for my design tutorial so that it doesn't get lost among the other posts in my blog. You will find that tab next to my Free Patterns tab.

Now I think it's time for me to take a break from designing, writing, and editing to tat something from a book :)

Friday, June 13, 2014

iPad Design Tutorial: Part 5

Making Adjustments and Finalizing Your Piece

Last time, I talked about how to begin tatting your design. Now it's time to talk about making adjustments and putting the final touches on your piece.

Nearly all of my designs go through a series of changes before becoming written patterns. The types of changes that I make can be lumped into four categories:
1.) Trial and error
2.) Altering the size of an element
3.) Relocating picots
4.) Making last minute changes to improve visual effect

Let's talk about them in order, starting with trial and error. Most of my adjustments are based on trial and error, especially in the beginning stages of designing. I like making snowflakes because I can use each of the six points to try something new. Often, the first version of my snowflake will look horrendous, with six differently tatted sides. If you read my post about designing Solstice, you will see what I am talking about.

I don't worry about things looking pretty at this stage. I simply try to get an overall "feel" for the pattern, finding stitch counts that form a good solid base. These counts will undergo smaller changes later on.

Now, let's talk about the second category: altering the size of an element. This happens when I have a ring or a chain that is proportionally out of sync with the overall piece. It can also happen when I want to adjust the size of my entire design to create, for example, more open space. (You could say that using a larger thread will also create a larger piece, but sometimes that is not the effect I am looking for.)

Let's use the snowflake from this tutorial as an example. In my previous post, I mentioned wanting to have more negative space to make room for a jewelry finding in the center. I don't own any thread larger than size 20, so I couldn't take the easy way out by using a larger thread. Instead, I relied on simple math to make everything bigger. Here, I changed all of the 2's to 3's:


By turning every 2 into a 3 I ended up increasing the size of my motif rather drastically. If you want to make a smaller adjustment, carefully select a few locations to add a stitch or two. Or, if you are good at math, you can calculate changes in size by using ratios.

Thursday, June 12, 2014

iPad Design Tutorial: Part 4

How to Begin Tatting Your Design

Now that we have a rough estimate of stitch count, it's time to begin tatting. This is the most rewarding, yet most challenging part of the design process. In fact, it's even difficult to write about. Designing is a very subjective thing, and everyone will have their own styles and methods of creating their piece. As such, I will be straying from talking about design objectively, and instead show you how I tat my designs. As you follow along, perhaps you will find some tips and tricks that will be useful in your endeavors.

Let's begin by talking about thread. I've tried designing using variegated thread and have found that it makes my tatting unnecessarily hard to see. Therefore, I stick to solid colors. I've also tried using leftover bits of thread and found myself running out before getting very far. I would rather be designing than tatting four ring butterflies, so I had to part with the idea of saving every last scrap from the bin. The following bits were unwound and thrown away because I was running out of empty shuttles to use.


This brings me to my next topic: wasting thread. When you design, you have to get used to the idea of wasting thread. There will be a lot of prototypes that don't fit the bill, and a lot of reloading of shuttles. If you'd rather not waste your good thread you can buy a ball of cheap thread just for design drafts. If you are near a Jo-Ann Fabrics or a Michaels you can buy a ball of size 10 Aunt Lydia's crochet cotton, usually with a 40% discount. I always have my smart phone with me so I can quickly load up a coupon before entering the store.


Keep in mind that crochet cotton will not tat as nicely as tatting thread, and you will need to use a larger shuttle when working with size 10. I prefer using Lizbeth size 20 for my drafts because it tats rather nicely and I have a large stash that I would like to reduce.

Wednesday, June 11, 2014

iPad Design Tutorial: Part 3

How to Make a Rough Estimate of Stitch Count

In the previous post I talked about how to draw a design that can be turned into tatting. Now, it's time to make a rough estimate of stitch count so we can begin to create our piece.

First, you will need to make a sample piece of tatting to use as a measuring tool. I recommend choosing a color and size that will be easy to see, so that you can count stitches to approximate the location of your joins. To keep things consistent, make sure to use the same color and size for all of your measuring samples. I used size 20 white, simply because I had a lot of it on my shuttles.


For my sample, I used rings and chains, increasing the stitch count as I progressed. The stitch count is as follows:

Ring 2-2
Chain 2-2
Ring 3-3
Chain 3-3
Ring 4-4
Chain 4-4...and so on until I reached a ring of 14-14

Using this sample, I can easily count up from 2 to see which ring or chain I am at, instead of painstakingly counting each stitch. You can use my stitch counts, or you can create your own. You may also wish to include clovers, self closing mock rings, or other shapes in your sample if you think they will be useful.

Tuesday, June 10, 2014

iPad Design Tutorial: Part 2

How to Draw a Design that can be Tatted

Now that we've practiced using Kaleidoscope Drawing Pad, it's time to draw our design. It can be tempting to draw something very complex, but I urge you not to do this, as the result will be difficult if not impossible to translate into tatting.


If this is your first time using the app to design, I recommend starting with something simple. You can always move onto more complex projects later on. Below is the first drawing I tatted, and as you can see it has only clovers and chains:


I didn't take any measurements before tatting the piece pictured above. Instead, I relied on memory and used similar stitch counts to a motif I had just completed from Tatting Patterns and Designs by Blomqvist and Persson. You can try to tat your design without taking measurements, though I recommend at least measuring a few rings and chains. I will talk more about taking measurements in Part 3 of the tutorial.

Monday, June 9, 2014

iPad Design Tutorial: Part 1

How to use Kaleidoscope Drawing Pad

Those without an iPad may wish to head over to Elaine's blog to access her free tatting design software for the computer. I will be focusing on using an iPad, so the first few parts of this tutorial will not be relevant to computer users (though you may find some helpful tips later on in the tutorial).

Update: If you are using a different kind of tablet, you may have better luck searching for "Doodle" or "Drawing" in your App Store. I've run a quick search and come across Magic Doodle, which seems to be a comparable program for the Android. It's also free.

For those with an iPad, the first thing you will need to do is go to the App Store and search for "Kaleidoscope." Here you will find a free app called Kaleidoscope Drawing Pad by Bejoy Mobile. Download this to your iPad.


The app is pretty straightforward, but I will go over some of the features that I regularly use.

Sunday, June 8, 2014

iPad Design Tutorial: Introduction

If you have an iPad and are interested in designing, part one of my five part tutorial begins tomorrow. I will post one part each day and come back to make edits if anything is unclear, so if you are following along and have any questions, don't hesitate to ask in the comments below each post.

I find that using an iPad is a great help when brainstorming symmetrical designs such as snowflakes, flowers, small doilies, squares, butterflies, and crosses. If, on the other hand, you prefer making edgings, large doilies, or more free form shapes such as animals, then iPad design may not be for you.

I've broken up my tutorial into five parts in an attempt to provide as much detail as possible. They are as follows:

1) How to use Kaleidoscope Drawing Pad

2) How to Draw a Design that can be Tatted

3) How to Make a Rough Estimate of Stitch Count

4) How to Begin Tatting Your Design

5) Making Adjustments and Finalizing Your Piece

As you follow along with the tutorial, please keep in mind that I will be sharing what has worked for me, but that my methods may not work for you. Each of us has our own preferences, and I know a lot of you won't be keen to use the iPad to design at all. It is a very tedious process, as you will soon see!

Monday, June 2, 2014

Sneak Peek

I've finally gotten around to creating a pattern that will be suitable for an iPad design tutorial. I've been wanting to make a tutorial for a number of months, one that can be used as a detailed reference for anyone who wants to try their hand at using an iPad to design.

Here's what I've come up with:


The larger version is tatted in Lizbeth size 20 white, with a jewelry finding I purchased at Hobby Lobby:


The smaller version is tatted in DMC Cordonnet Special size 50 Blanc. I think the DMC has a more delicate look:

It will be a while before I make a proper diagram, so I've included a picture of my notes if anyone wants to use them as a guide. If you right click on the photo and open it in a new tab it should be large enough to see the numbers. If not, let me know in the comments and I will see what I can do.


I hope to get the tutorial finished in a few weeks. It will consist of multiple posts, and I will post one part each day, so keep an eye out if this is something you are interested in!

Update: I've uploaded this pattern to my Free Patterns page


Enjoy!