Custom Pages

Thursday, December 29, 2016

Crystal Star and some knitting

As the weather gets colder I've been spending some time knitting leg warmers to combat the drafts around the apartment. I also managed to do a bit of tatting and made Joëlle Paulson's Crystal Star. I've tatted a few of her patterns before, and they are always quick and easy to make.


As for the knitting, I'm a perpetual beginner! It just doesn't hold my interest in the same way that tatting does. Every couple of years I buy some cheap yarn and knitting needles and watch a few YouTube videos so I can re-learn how to knit and purl. The good news is that it seems to be easier each time I revisit it. The bad news is that knitting only holds my attention for a few weeks before I'm back to tatting. Who knows? Maybe I'll develop an interest in knitting someday!

Monday, December 19, 2016

A few more flakes

I've been tatting a few more snowflakes to compare thread and crystal sizes:


The one in the upper left is tatted with size 80 DMC thread and 4mm Swarovski Crystals. The middle snowflake is tatted with size 50 DMC thread and 5mm Swarovski Crystals. The snowflake on the bottom right is tatted with size 20 Lizbeth thread and 6mm Swarovski Crystals. I'm very pleased that the different sized crystals worked so well with all of my thread!

Measurements for each snowflake (from point to point) are as follows:

  • Size 80 thread: 3.4 inches
  • Size 50 thread: 4 inches
  • Size 20 thread: 5.25 inches

For instructions on making these snowflakes, please see my previous post. I've updated that post to include crystal and picot gauge information for sizes 80, 50, and 20 thread. I wouldn't recommend making it in size 20 though...the points tend to flop a bit due to its size. Just look how big it is!


I much prefer the snowflake in smaller threads (size 50 or 80). Here's how the smallest, size 80 snowflake looks:


Also, be sure to check out Frivole's new video where she shows how to add the crystals to the center of a tatted star. I've been using her method to add the crystals to the center of my snowflakes. It's really a very clever technique!

Thursday, December 15, 2016

Dainty Snowflake

Well, it's not a very original name (it's been used for lots of crafted snowflakes), but I still wanted to call this one Dainty Snowflake because it's been designed to be tatted with small thread. I've been making these to put into Christmas cards and to give as gifts.


The one on the left has been tatted with size 80 DMC Cordonnet Special, using 4mm Swarovski bicone crystals in the center. It measures 3.4 inches from point to point. The one on the right is tatted with size 50 DMC Cordonnet Special, which is about the same as Lizbeth size 40 thread. It measures 4 inches from point to point.

As a holiday gift to my blog readers, I'm including the hand drawn diagram for this pattern below :) Right click and open the image in a new tab to see the numbers more clearly:


UPDATE: Here are a few more diagram photos that are colorized to show when to reverse work. Reverse works will occur every time the color changes from red to blue, or from blue back to red:


I've been having a lot of fun using Frivole's method to add the Swarovski Crystals to the middle of the flakes. These are placed instead of the central 4-2-4 rings in the above diagram (see below for more details about sizing).

The pictorial for Frivole's technique is part of her Crystal Star pattern, which is available in her Etsy shop. Frivole has also uploaded a YouTube video showing how to add the crystals to the center of her star.

Sizing for the Crystals:

For each snowflake you will need six crystals, and a large picot gauge. I made my picot gauges by measuring and cutting index cards.

In size 80 thread you will need:

  • 4mm Swarovski Xilion Bicone crystals
  • 60 mm picot gauge


In size 40 to 50 thread you will need:

  • 5mm Swarovski Xilion Bicone crystals (these can be purchased on eBay)
  • 74 mm picot gauge


In size 20 thread you will need:

  • 6mm Swarovski Xilion Bicone crystals
  • 90 mm picot gauge. (The 90 mm picot gauge will make the crystals very snug, so if you feel like this might be a problem, increase the gauge by a couple of millimeters.)


Although I've included details for size 20 thread, you probably don't want to use anything larger than size 40 (unless you want a really big snowflake). I think size 50 DMC thread makes a good snowflake:


If you have any questions about the pattern, feel free to let me know. Now I must get back to tatting snowflakes...

Tuesday, December 6, 2016

Thank you!

Thank you to everyone who voted in the 2016 Craftree Awards, and congratulations to all of the winners! I was (and still am) quite embarrassed to find that I've won in two categories. There are loads of talented tatters and designers, may of which were not included (as each category was limited to five nominations). When it came time to vote, I found it very difficult to choose!

As for tatting projects, I've switched gears and have started making snowflakes for the holiday season. I wanted to try using Joëlle Paulson's technique for adding Swarovski crystals to the center of a snowflake, as seen in her Crystal Star pattern. Joëlle provides a 52 mm picot gauge to add five crystals to the center of her star. With a little bit of math I calculated that six crystals would need a 62 mm picot gauge, and luckily it worked out!

I love working with DMC thread whenever possible, so I designed this to be used with DMC size 80 Cordonnet Cotton:


My next version will be tatted with rings in the center instead of beads, and I'm going to play around with the stitch counts to see how it looks with less negative space.

Tuesday, November 29, 2016

Magic Square Pattern is in the Shop

The Magic Square pattern is now available in my Etsy shop as an instant digital download (click here). This is what the 7 page pattern looks like printed out:


I spent many hours trying to come up with written instructions, but in the end I decided to go with diagrams only as I just could not convey the pattern properly with text. The pattern file includes four diagrams showing different options that you can make with the design, as well as a short pictorial page showing how to build the squares.

Overall, I had enough time to tat three of the options. These options are just a starting point, and you can certainly go beyond what is shown in the diagrams. You can also tat a very large triangle (instead of a square) to form a shawl. All patterns are completed in one continuous round.

Option #1 is the smallest, and easiest to tat:


Option #2 is a little larger, but not too difficult:


Option #3 would have taken an extra 30+ hours to make, so I don't have any images of it. It would look similar to connecting four Option #1 squares together into a larger square (all of these Magic Squares double as repeatable squares).

Option #4, which I have been showing on my blog over the past few weeks looks like this:


I found it very tricky to keep my place in this large square because it is all tatted in one round. I used lines of symmetry to remember where I was in the pattern, constantly tatting mirror images of what was on the other side. At this size, it's nearly impossible to follow a diagram...definitely not for beginners!

If you have any questions or are confused about parts of the pattern I am always here to help. You can contact me through my Etsy shop, the contact form on the sidebar of my blog, or by email which can be found on the About Me page. Please do check your junk folder for replies, as they often get stuck in there!

Monday, November 21, 2016

Finished!

Here is the completed Magic Square, after spending a bit of time on the blocking board.


I used about 1 ball of DMC Cordonnet Special in size 50, and the project took somewhere around 60 hours to tat. The finished square measures 9.5 inches across and 13 inches diagonally. You can get a better idea of its size in comparison with this blocking board:


I went to a few craft stores looking for a frame, but couldn't find anything I really liked. I was hoping for a round frame and didn't realize that the craft stores around here don't sell them. In the end, I settled for an inexpensive square frame, just so that the tatting can be displayed and protected. If I see a nicer frame later on, I can always switch out the tatting.


I've been spending some time trying to write up instructions for this pattern and it's proving to be very challenging! Due to the nature of the design (see here for the possibilities), it requires many diagrams and a sort of "choose your own path" for the written instructions. I'm going to persevere and hope to get it done and posted to my shop in a few weeks.

Friday, November 4, 2016

Halfway

Progress is slow, but I am now halfway through the magic square.


At this stage, it's still hard to tell how the finished square will look. I think it will take another 3 to 4 weeks before I have it completed.

Friday, October 21, 2016

Progress on the Magic Square

I've been working on making a larger version of the magic square that I wrote about in September. Here is where I am at so far:


Beginning in the corner makes it less fiddly when finishing the square, however, there is also a hidden benefit to starting in this position. Each time a triangle is completed (such as the one pictured above), I have two options. I can work clockwise and continue to make a larger triangle (and thus a larger magic square) or I can work counter clockwise (where the shuttles are placed) to finish the square.

To understand this concept more clearly, picture each magic square as being composed of four triangles. The first, and smallest of the magic squares can be represented like this:


Tatting a slightly larger triangle (a combination of the bottom and rightmost triangles pictured above) creates a new magic square:


Using a simple collage app and drawing app on my iPad, I can get an idea of what each new magic square would look like. Option three, which is how I initially intended to make my magic square, looks like this:


Proceeding even further, a fourth option arises. The first image in this blog post, repeated four times, will yield this result. I like the way this one looks so I'm going forward with this option:


To get really crazy, a fifth option (which I don't have the stamina to complete) would look like this:


All in all, I think this is a really neat experiment and I am excited to see what the finished square will look like.

Friday, October 7, 2016

Mary Konior's "Patchwork" as a magic square

In my last post, I talked about wanting to create a magic square out of four ringed flowers, similar to those used by Mary Konior. The more I thought about it, the more I wondered, "Why not transform one of Mary's patterns into a magic square?" That idea seemed like more fun, and so I went along with it. I'm a big fan of Mary's patterns and I think this one turned out nicely.


This pattern is called "Patchwork" and appears in Mary Konior's Tatting with Visual Patterns. The original pattern is a small repeatable square that can be connected to other squares to make a large mat. I transformed it into a magic square by adding trefoils to the corners of the small squares.

For those who would like to try this pattern adaptation, here are my notes. As you tat this, keep in mind that the central flowers have a slightly different stitch count so they can attach to the trefoils. I've also changed a lot of the original stitch counts to suit my tatting style:


Right clicking and opening the photo in a new tab should make the stitch counts large enough to read. Numbers in the diagram show one repeat. The flower in the lower left corner (where numbering begins) is a good place to start tatting this pattern.

If you are really ambitious, you could make the square much larger. I digitally altered the photo to give an idea of what a larger magic square would look like:


I'd recommend starting in the corner and working your way around like this:


This larger square is all done in one pass, but it is quite a maze and careful attention is needed to keep your place!

Friday, September 30, 2016

Magic Square, with triangles?

I stumbled upon this idea quite accidentally, as I was making some adjustments to one of my triangle bookmarks. I wondered, "What would happen if I combined some of the elements of the bookmark with one of my repeatable squares?" After sketching it on my iPad, I realized that I had created a variation of the magic square. Here it is, tatted in Lizbeth size 20, Country Grape Medium:


It is all tatted in one pass, but I had to add new thread as my shuttles weren't large enough to hold what was needed.

For those who are unfamiliar with the magic square, it is a tatting pattern made up of simple rings and chains. What makes it "magic" is the fact that it is cleverly designed so that one could, in theory, make a square of any size, all in one pass. I've never tatted the original, but I have seen a number of photos (Google "tatting magic square") and there have been some forum and blog discussions about the pattern. By the way, does anyone know the origin of this pattern?

What I find fascinating is that the magic square can be made with many different elements. It might be possible to use any ring formation that can be joined at a 90 degree angle. I wonder if four ringed flowers (similar to what Mary Konior used in her tatting) would work? I think that will be my next experiment.

Thursday, September 22, 2016

Small Cross (made from a repeatable square)

Here is a small cross, made using the repeatable square design from my last post. On the left (in burgundy) is the square, and on the right (in blue) is the cross:


If you missed my last post, you can click here to see what the squares look like when they are put together.

Sunday, September 18, 2016

More repeatable squares

I started losing steam toward the end of this, but managed to finish it yesterday. It has sixteen repeatable squares, and I'd like to try to add an edging to it later:


I still have another set of repeatable squares that I'd like to work on, but I think I will make a few smaller projects in between. Tatting the same thing over and over again gets tiring!

Thursday, September 8, 2016

Four Square

Well, this isn't exactly what I intended for the design, but I have a good idea of how to proceed:


It started out as a small repeatable square:


Which was connected into four squares:


I wanted to put an edging around the repeatable squares but was having trouble coming up with something that would fit. My goal is to make the edging repeatable, so that it will work with any amount of squares. Unfortunately, my first attempt (pictured at the top of this post) will only work with a sequence of four squares.

After that attempt, I looked through a few of Jan Stawasz's patterns and realized that I could make the edging from a mirror image of what was happening in the square pattern. I've got it all figured out on my iPad, but nothing to show just yet. Actually, while I was piecing things together, I stumbled upon another repeatable square, which I've been distracted by:


All of these designs are a continuation of the triangle theme that I've been posting about. I didn't realize how many paths this would take me down...this will easily keep me busy for the rest of the year!

Wednesday, August 31, 2016

Bookmark

I decided to make a bookmark using the same triangles from my previous posts, this time in Lizbeth size 80 Rainbow Taffy.


Here's another photo of it in The Complete DMC Encyclopedia of Needlework, which I found for a few dollars at a local used book store:


I'm making a few more patterns (repeatable squares), and after that I will be finished with my triangle experiments. I'll make a post showing all of the triangle patterns together when I'm done.

Tuesday, August 23, 2016

Small Mat

I've been seeing fewer complaints on the Etsy forums about payment processing issues, so I think it's mostly been fixed (though the occasional issue pops up now and again).

A few days ago, I finished this small mat in DMC size 80 thread. This is a continuation of the triangles theme that I have been blogging about (see my previous post for more). This mat could be made much larger, but I just wanted a sample to place into my tatting binder. Here it is with an antique rubber tatting shuttle for scale:


Before I begin designing, I always need a visual reference. For this mat, I needed to find a pathway that would allow me to complete it in one pass and maintain symmetry on both sides. Using my iPad, I began by taking a photo of the small strip of triangles from my previous blog post:


I used an app called PhotoGrid to make a rough "collage" of the tatting, and another app called You Doodle to draw around the edges and polish up the shape of the mat. Here is the resulting image:


From here I continued using the You Doodle app to draw a path through the maze of triangles:


This maze was a little more tricky than normal, as I wanted to maintain symmetry on both sides of the mat and complete it in one pass. If I didn't care about symmetry, I could have simply snaked back and forth, back and forth.

I experimented more with the above pathway, and found that it can be repeated indefinitely. So, if you have a lot of patience, you could make an entire tablecloth this way, only stopping to reload your shuttles when you run out of thread:


On another note, for those who remember the stray cat from my previous post, here is Mama Cat with her four kittens:


They are getting a lot bigger now. Right after I snapped this photo, the black kitten saw me and got really spooked. So I've been trying to leave them alone :)

Wednesday, August 10, 2016

Issues with Etsy's payment processing, and more triangles

In the month of July, I received several emails from Etsy letting me know of problems they were having with their Direct Checkout system. Well, it looks like similar issues are now effecting PayPal's integration with Etsy (though PayPal itself is just fine and will work on other websites). Despite many concerned sellers on the forums, I have yet to see a resolution to this problem.

One workaround suggested by a few sellers is to set up "Other" as a payment option. I have just enabled that in my shop, which allows me to email PayPal invoices to those who wish to make a purchase. For PayPal users, this means that you would complete the checkout process as usual, but click on "Other" when it asks how you want to pay. Apparently, this method of checkout is unaffected by whatever issues are currently plaguing Etsy.

I know that this is much more tedious than it should be, and I'm hoping that there will be a fix soon. If problems continue, I may look into opening a Craftsy store to offer a more stress free option of purchasing patterns.

On the tatting front, I have been continuing my experimentations with triangles. Kathy left a comment on one of my previous posts directing me to experiments that she and Sue had done with triangles before. ::Click here for Sue's post::   ::Click here for Kathy's post::

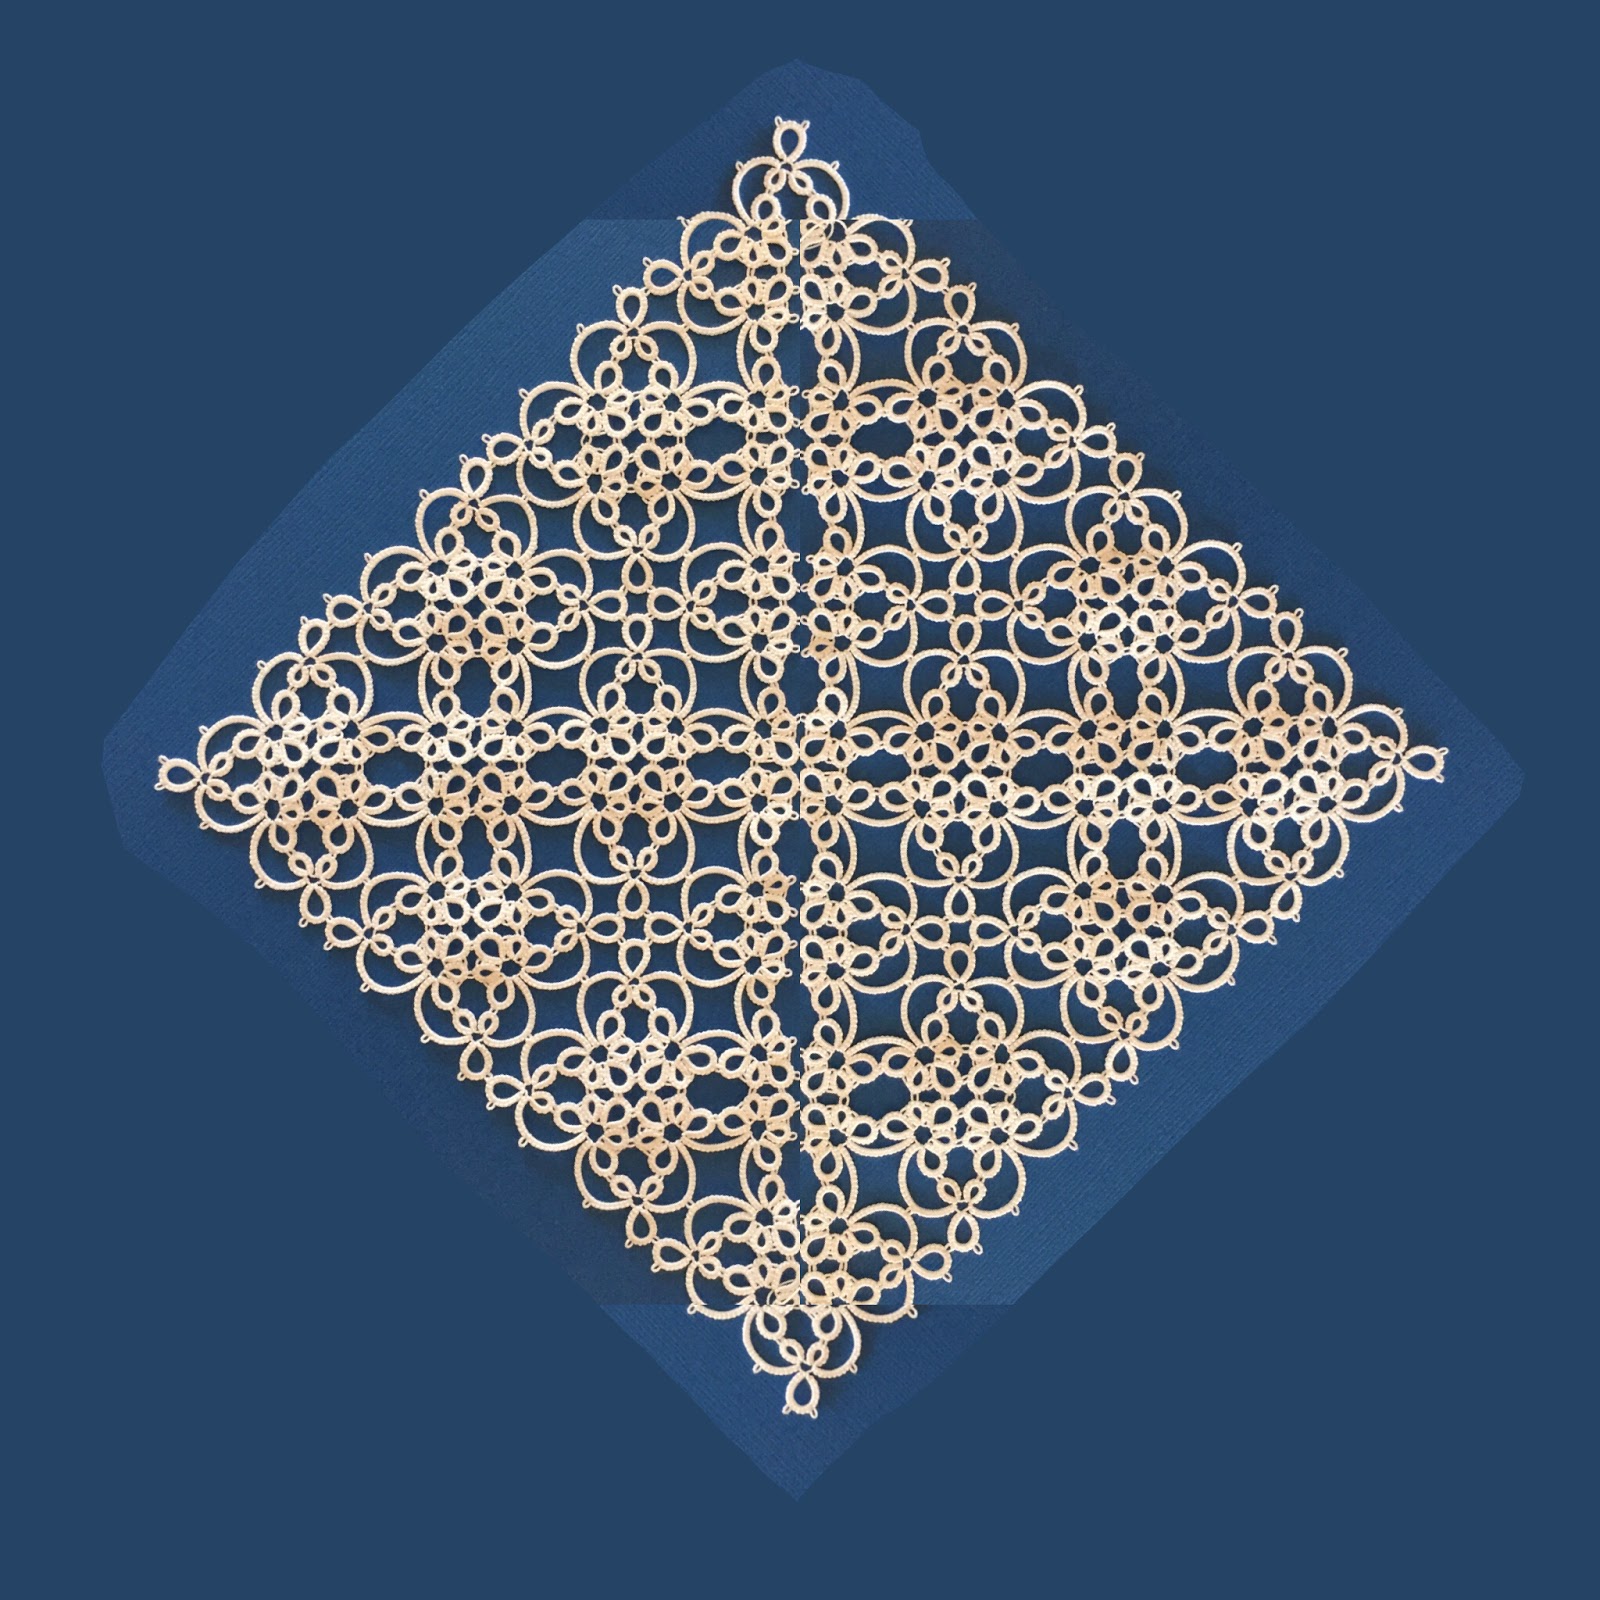
I've been working on making a small mat using DMC size 80 thread. At this point, it could be used as a bookmark (or continued further in length for a choker or headband):


The pattern is done in one pass, using split rings to travel from one triangle to the next. I've exited at the top so that I can continue creating more rows for a mat.

Like Sue, I also made a hexagon. I think it would look better with a few more rounds, and perhaps in a solid color.


The small "braid" in the upper right corner was a test piece to make sure that the triangles fit together. Mary Konior made a lot of these braids throughout her books (Corn and Chaff is a good example). I've often wondered how Mary came up with all of her braid patterns. I'm starting to think that maybe she just experimented with a lot of different ring sizes and ways to connect them. Perhaps with more practice, I can come up with patterns like hers :)

As I was taking photos for this blog post, one of our local stray cats made an appearance on the porch. I call her "Mama Cat" because she has four little kittens that usually accompany her. (Apologies for the filthy sliding glass door...I've got to go clean that!)


Mama Cat has been wandering around for at least a year, and I always thought that she was someone's pet. However, when we saw the kittens, I realized that she was a stray. There's also another mama cat that is the same color as her, but with two kittens. We've had both cat families come over (never at the same time) to eat and drink. They are sneaky little things and sometimes the only sign that they've been here are the empty cat bowls in the morning.

Friday, July 29, 2016

Sunflower

After seeing Joëlle tatting Blomqvist and Persson's Ice Crystal, I just had to revisit my copy of the book and join in. I've tatted a few of the smaller snowflakes from this book before, but this time I decided to try one of the doilies. This one is called Sunflower:


It's tatted in Lizbeth size 40, Spring Garden and White. It definitely needed blocking after Round 2 because the doily was ruffling quite a bit. Luckily, Round 3 was a lot easier and didn't pose any problems. Here is the finished doily on a black background:


As I was tatting the doily, I kept wondering if Lizbeth thread was too stiff for the project. This seems to happen mostly with white thread, and I don't notice it too much with the colors. Next time I tat something from this book I might try using DMC Cordonnet Special to see if it makes a difference.

Wednesday, July 20, 2016

Triangles (Part 2)

This is a continuation of my previous post in which I was exploring different patterns that could be made with triangles. I was able to put together a cross based on the bookmark pattern:


Like the Priscilla Cross, this is a large piece of tatting and takes a while to complete. In size 40 thread it measures 6.75 inches long and 4.75 inches wide. You can get a better idea of how big it is in this photo:


I also wanted to mention that if you send me a message through my Blogger Contact Form, please check your spam/junk folder for a reply as well as your inbox. I try to respond within 24 hours, but sometimes my responses get sent to the spam folder (especially for those using Yahoo accounts). Always feel free to send me another message if you haven't heard back within a few days. It probably means that something went amiss with the email filters!