Custom Pages

Wednesday, December 18, 2019

Stacks of Snowflakes

I'm still enjoying making mini snowflakes. I have over 20 of them now:


Here's another photo of them placed on decorative scrapbook paper. It was difficult to fit them all:


I have several more drawings waiting in the queue, and am looking forward to continuing this project next year.

Monday, December 2, 2019

Mini Flakes

I tatted some of these mini snowflakes last year and made a few more this year. They are relaxing to make because they are quick and easy to design.


Other than my notes, I don't have any patterns written for these. I'm thinking of continuing this project next year, and accumulating more designs before I go into pattern writing mode.

A quick reminder: My Etsy sale is almost over (it is set to go through Tuesday, December 3rd and end at midnight, Eastern Standard Time). If you'd like to check out my shop, you can get to it by clicking HERE.

Monday, November 25, 2019

Etsy Sale

I'm having an Etsy sale with everything in the shop 20% off, now through Tuesday, December 3. If you'd like to check it out you can get to my shop by clicking HERE.

Below is a photo of some of the designs available in my shop:


If you're wondering why I still have all of these tatted samples, it's because I file them away into binders each time I make a new pattern. I'm up to four binders now.


The tatted samples are placed into plastic sheet protectors. I try to remember to put my pattern notes in there too.


Each binder holds somewhere around 20 to 25 patterns. The tatted samples make the pages bulky, so the binders don't hold has much as they would if it was just paper.

Monday, November 4, 2019

Designing with Amaziograph

When I design a piece of tatting, I almost always need to work from a visual reference. I can kind of picture designs in my head, but the ideas are fuzzy, so I draw them on my iPad. For the past few years, I have been using an app called Amaziograph to brainstorm tatting designs. It works best for things that are symmetrical, such as doilies, snowflakes, and squares.

Here is my latest project, a small doily. The first photo shows the doily at about the halfway point. It is tatted in Lizbeth size 40 thread in white, and the Amaziograph drawing can be seen in black on my iPad:


I was worried about the outer chains because they are so long, but was able to get them to work by using balanced double stitches. Here is the finished doily next to the iPad:


Even though I have the drawing, stitch counts are still figured out the old fashioned way: through trial and error and past experiences. Stitch counts get a lot easier to calculate after years of practice. I've built up a kind of mental knowledge base and can get fairly good starting numbers just by looking at a drawing.

There's still a lot of work to be done for this pattern, including creating the diagram, written instructions, test tatting, and compiling some information on balanced double stitches. It will be a little while before the pattern is ready, probably December at the earliest.

Wednesday, October 16, 2019

Challenge Snowflake

This is a free instructional pattern for those who want to practice different tatting techniques. You may use this pattern as a teaching resource (but do not sell the pattern) and may do anything you like with the finished tatting. Please let me know if you find any errors in the pattern.


For a printable version of this pattern click HERE. For tatters who would like more detailed instructions and step by step photos, continue reading the blog post below.

To make this snowflake you will need to know the following techniques:

  • rings, chains, picots, joins
  • lock joins
  • thrown rings (AKA floating rings)
  • split rings, joining to the second side of a split ring
  • self closing mock rings (SCMR)
  • Josephine knots, self closing mock Josephine knots
  • balanced double stitches
  • using a picot gauge

You can go to YouTube and find videos for most of the techniques listed above. If there is a technique that you cannot find, leave a comment below or message me using the contact form on the right sidebar of my blog and I will see if I can locate a good video for you.

The balanced double stitch is a technique pioneered by Ruth Perry (you can visit her website at https://rozellalinden.net/). You can read Ruth's article about the balanced double stitch here: http://www.georgiaseitz.com/2008/ruthplongringchains.pdf

To see a short video of her making the balanced double stitch go here: https://youtu.be/A3c99nb0CIg

Challenge Snowflake by Robin Perfetti

Begin by winding two shuttles using the continuous thread method. When using size 20 thread and a small clover shuttle, I wind 240 full wraps on shuttle #1 and 75 full wraps on shuttle #2. Most of the work will be done with shuttle #1.

Round 1:


Round 1 is a basic six-ringed flower, made with shuttle #1. Each ring is 2 - 2 - 2 - 2, and all picots are very small. All new rings are joined to previous rings. The final ring is a split ring and is joined to the previous ring as well as to the first ring, 2 + 2 / 2 + 2. Making a split ring enables us to climb from Round 1 to Round 2.


Round 2:


Do not reverse work after Round 1. Begin Round 2 by making a split ring of 4 / 4. You can leave a very small gap between the split ring of Round 1 and the split ring of Round 2 to simulate a very small picot:


Do not reverse work after the split ring. Place shuttle #1 in the chain position and place shuttle #2 in your right hand. Make a chain of of 5 balanced double stitches. Balanced double stitches form a sturdy, straight chain:


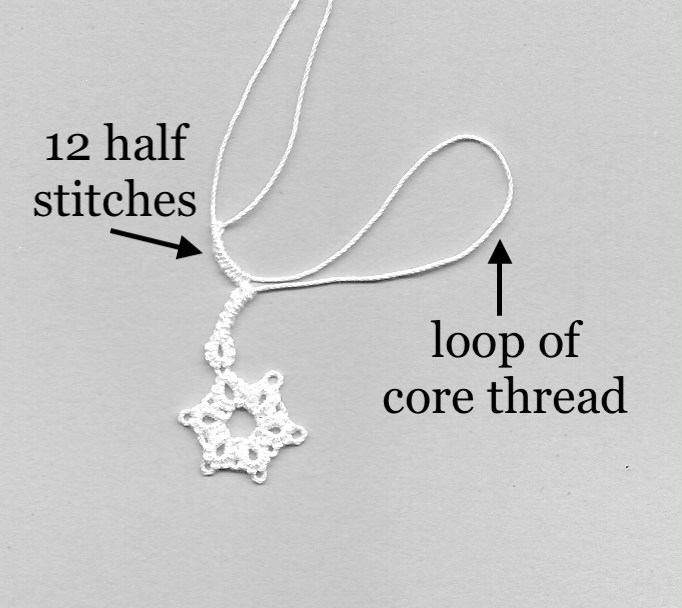
The next element is a self closing mock Josephine knot. It is made the same way as a self closing mock ring (SCMR), except that the mock ring is made of 12 half stitches instead of full stitches. Here is a photo of the self closing mock Josephine knot before closing:


This is how it looks after closing:


Making a self closing mock Josephine knot (instead of a thrown Josephine knot) will disrupt the core thread. This disruption enables the next chain to change directions and move back down towards Round 1. After the self closing mock Josephine knot, make a chain of 5 balanced double stitches. Then, tat a ring of 4 + 4 (joining to the ring from Round 1):


Continue in this way around the center, until you reach the place where Round 2 began. Finish by making a lock join near the base of the 4 / 4 split ring. It takes some effort but a small crochet hook can be squeezed through the spot between the base of the ring and the first chain to make this lock join. Our threads are now in position to begin working on Round 3:


Don't worry if Round 2 has slight cupping. This is by design and will flatten out after Round 3 is added.

Round 3:


Do not reverse work after Round 2. Keep shuttle #1 in the chain position and shuttle #2 in your right hand. Make a chain of 6 balanced double stitches:


Next, make a thrown ring of 5 - 1 --- 7. If you are using size 20 thread, make the long picot 7 mm tall. If you are using size 40 thread, make a 5 mm tall picot. For size 80 thread, make a 3 mm tall picot. I used a clover picot gauge to size my picot:


After closing the thrown ring, it will look like this:


Next, make a chain of 5 balanced double stitches:


After this, you will need to pinch a section of core thread to make another SCMR. The SCMR has a few Josephine knots thrown off it, as well as a clover. Written instructions for the SCMR are as follows:

SCMR
Chain: 3, do not reverse work (DNRW), switch shuttles (SS)
Josephine Knot: make a ring of 12 half stitches. DNRW, SS
Chain: 3 - 2, DNRW, SS
Ring: 2 + (join to previous chain) 2 - 1 -- 1 - 2, DNRW
Ring: 2 + (join to previous ring) 4 - 1 -- 1 - 4 - 2, DNRW
Ring: 2 + (join to previous ring) 1 -- 1 - 2 - 2, DNRW, SS
Chain: 2 + (join to previous ring) 3, DNRW, SS
Josephine Knot: make a ring of 12 half stitches. DNRW, SS
Chain: 3. Close SCMR

This is what the SCMR looks like before closing:


And here is what it looks like after closing:


Do not reverse work after the SCMR. Make a chain of 5 balanced double stitches. Then, make a thrown ring of 7 --- 1 - 5, using a picot gauge to measure the long picot as before. Finally, make a chain of 6 balanced double stitches, and lock join to the gap near the base of the ring from Round 2:


The next chain is made of 6 balanced double stitches. You can count the previous lock join as the first half of the first balanced double stitch if you want. I find that it helps to even out my tatting. (If you do this, you would tat the second half of a balanced double stitch followed by 5 full balanced double stitches):


Now, make a thrown ring of 5 + 1 + 7, joining to the small picot and large picot of the previous thrown ring:


You can use the point of your tatting shuttle to adjust the long picot as desired:


Begin again at Round 3's chain of 5 balanced double stitches, (followed by the self closing mock ring), and continue working the instructions until you reach the final thrown ring.

Joining the final thrown ring back to the first thrown ring can be tricky. You don't need to make a folded join here. Instead, you can rotate the tatting counterclockwise until it is in a comfortable position to make the join. Here is the tatting in the normal position:


And here is the tatting after it is rotated into a more comfortable joining position:


The first join after it is made:


The closed ring after first and second joins are made:


After this, it is just a matter of making another chain of 6 balanced double stitches. Cut, tie to the place where Round 3 began, and hide ends.

Here is the finished snowflake:


Tuesday, October 8, 2019

Technique Practice

After tatting some of Joëlle Paulson's snowflakes, I was inspired to try out some new (to me) techniques to create a design of my own. I really like her use of self closing mock rings to extend the points of the snowflake in Le Flocon Frivole, and her use of lock chains to make straight lines in her other designs (click HERE to view the patterns page on her blog).

I don't have much luck with lock chains because they require a lot of support from other elements to keep them straight, but I did remember another technique called balanced double stitches that also creates straight lines when tatting chains. After a lot of trial and error I ended up with a usable snowflake design. Pictured below is all of the tatting that I did to get there:


This snowflake uses a lot of techniques. In addition to regular rings, chains, picots, and joins, there are:

  • split rings
  • joining to the second side of a split ring
  • lock joins
  • thrown rings
  • Josephine knots
  • self closing mock rings
  • self closing mock Josephine knots
  • balanced double stitches
  • use of a picot gauge

All in all, it's much more complicated than I like for an Etsy shop pattern. However, if anyone is interested in this design, I can look into sharing it as a free instructional blog post. Comment below if that's something you'd like to see.

Tuesday, October 1, 2019

Frivole's Flakes

A few weeks ago, I was lucky enough to win Joëlle Paulson's latest snowflake pattern through a drawing she had on her blog (leblogdefrivole.blogspot.com). I have tatted a few of her other snowflakes in the past and really admire the way she uses lock chains and other techniques to form angles, making the tatting look like real snowflakes.

I decided to tat the pattern I won (Calixa) along with Le Flocon Frivole and Qanik:


These three will be added to my Christmas tree in December.

Monday, September 23, 2019

Free Pattern: Onion Ring Bookmark

I made a few small adjustments to the onion ring edging and came up with an onion ring bookmark. I've created a basic printable pattern which you can find on my free patterns page or go to directly by clicking HERE. If you notice any errors in the pattern, please let me know.

I tatted the bookmark in DMC size 40 white, because I had some left over from my onion ring magic square. Then, I made another version in DMC size 80 variegated violet:


The violet version measures 1 inch across and the white version measures 1.4 inches across. The bookmarks can be made to any length you want.

Tuesday, September 17, 2019

Onion Ring Magic Square with edging

Here is the Onion Ring Magic Square with a finished edge:


The pattern for the edging and the square can be found on my Free Patterns page. If you want to go directly to the magic square pattern click HERE and the edging instructions are available in a blog post click HERE.

The finished square measures 10.6 inches x 10.6 inches when tatted in size 40 thread. I used Lizbeth size 40 in Ocean Teal Medium and DMC Cordonnet Special size 40 in white. One ball of each was plenty to finish the square.

Here are a few more photos:


This edging can easily be turned into a bookmark as well, which I will share in a future blog post.

Monday, September 9, 2019

Finishing up

I've finished the Onion Ring Magic Square and now I just need to add a border:


This is tatted in Lizbeth size 40 thread in Ocean Teal Medium, and DMC size 40 Cordonnet Special in white. It measures 9.5 inches tall and wide. Here is a bird's eye view:


The pattern for this is available on my Free Patterns page, or you can get to the pattern directly by clicking HERE. I started an Instagram account a few weeks ago (@tattingbythebay) and am also posting these photos there. I'm still getting used to Instagram and how it all works, but so far I'm liking the simplicity of the platform and being able to see photos of everyone's tatting very easily.

Wednesday, September 4, 2019

Revisiting an old project

This blog post is about the Onion Ring Magic Square. You can get to the free pattern by clicking HERE.

It's been a long time since I've worked on this piece of tatting. The last time I blogged about it was just about two years ago. I had originally planned to make the square bigger, but I changed my mind for two reasons. Firstly, I don't want to get overwhelmed by the amount of tatting and have this piece end up in the drawer again. Secondly, I'd like to try adding the border that I designed earlier this year, and I would not be able to do that with the original plans for the square. Here's my progress so far:


I had to undo a few rings and chains so that I could change direction from my original plan. Luckily, the process went smoothly and I didn't have any thread breakage.

I'm so glad I have information stored on my blog. I had forgotten what thread I was using for this project and had to look at my previous blog posts to find out. It's Lizbeth size 40 in Ocean Teal Medium, and DMC Cordonnet Special size 40 in Blanc (white):


I'm hoping to have the square finished within the next week or two and then I will be able to start on the border.

Wednesday, August 28, 2019

Trefoil Table Runner

After a year and a half, and about 200 hours of tatting, the trefoil table runner is finally finished:


The runner is tatted in Lizbeth size 20 thread. It measures 55 inches long and 8.5 inches wide. It is all tatted in one pass. You can get to the Etsy listing for the pattern by clicking HERE

I want to use this blog post as a companion to the written pattern (there's a link within the pattern that will direct here). I will be showing in progress photos of the table runner and will include some additional information at the bottom of the post.

The Trefoil Table Runner began as a challenge to make a magic rectangle (a rectangle that could be expanded to any size, all in one pass). I soon realized that the tatting path for this rectangle would be much different than what I was used to for magic squares. Instead of the complex magic square path, I needed to work back and forth in rows, similar to making a crochet blanket. However, to make both sides symmetrical, I had to work one half at a time. The tatting path is shown below:


For the actual runner, I started by making a strip of connected trefoils. I worked to half of the length of the dining table, letting the end of the runner drape a bit before turning the corner. Our table has a line down the middle where two pieces connect, so it was easy to measure the halfway point:


After turning the corner, I worked my way back to the middle of the table. Upon reaching the middle of the table I made another turn:


I want to point out that there is an extra trefoil along the edge. Below is a closer photo of it. The extra trefoil will line up with the middle part of the runner:


I continued working in this zig-zag fashion. Here is the second column in progress:


I decided to work a tapered edge to give the pattern a little more visual interest. Here are the third, fourth, and fifth columns being tatted:


After finishing the fifth column, my table runner was at the halfway point. I then needed to create a mirror image of the first half of the runner. Without cutting my thread, I worked another strip of trefoils, making sure it was the same length as the first half. At this point, I needed to move my table runner to the ottoman because it was becoming too long to photograph:


As with the first half of the runner, I worked back and forth in a zig-zag path. The two halves are connected horizontally, through the middle of the runner. Below is the seventh column being built and connected back to the first half of the runner:


The eighth and ninth columns are made in the same way. The tapered edge mirrors what was done for the first half of the runner:


The tenth and final column is worked back to the starting point. The last elements are joined back to the first, and the thread is cut, tied, and sewn in:


Here is a closer photo of the runner, including the tapered edge:


I worked from a 1 kg cone of Lizbeth size 20 thread. My finished runner weighs 107 grams, which is equivalent to about 5 balls of Lizbeth thread (each ball weighing 25 grams):


In total, my table runner has 478 trefoils. Each trefoil took about 25 minutes to tat (only 20 minutes for trefoils along the edge because they didn't have thrown rings). Using several Catherine wheel joins definitely slowed my tatting down quite a bit. Adjustments can be made to use other join types if speed is of concern.