Custom Pages

Tuesday, January 27, 2015

Tatting Pattern: Valentine Heart

Last week, Etsy finally came through and announced that they will be taking care of the VAT on the sale of digital items. The details are still being sorted out, and nothing has been implemented yet, but I'm glad that they are taking responsibility. (Click here to read more about it on the Etsy blog)

With Valentine's Day coming up in a few weeks, I decided to try my hand at designing a heart. The pattern can be found in my Etsy shop.

(Click Here to go to the listing)

You will need to supply your own filigree jewelry finding for this pattern (more details in the listing), or you could make the version with the tatted center.

This is the first heart that I have designed and I found it to be much more difficult than making snowflakes! I think it has to do with trying to get the shape right. I have no idea how other tatters manage to design things like animals. Maybe I will get there someday.

Here's an idea of the finished size, using Lizbeth size 20 thread:


I had a lot of fun playing with the design in different colors and different jewelry findings. I think I like the square filigree center best, but I'm wondering if there are heart shaped centers that would also work.


Wednesday, January 21, 2015

7) Drawing Split Rings in two colors

Today I will be making a long overdue post about how to draw split rings in Inkscape using two colors.

Phyllis sent me these instructions a few months ago (thank you Phyllis!) She has a tatting blog of her own, and if you'd like to check it out, you can do so by Clicking Here.

Update: I have found another method for creating split rings in two colors. If you have trouble with the instructions in this post, Click Here to try the alternate method.


The basic idea behind this method is to break a single shape into multiple line segments, so that each segment can be edited independently. By breaking a ring into two segments, we can color one segment red and the other blue (or colors of your choosing), to achieve the following results:


Let's get started.

To begin, you will need to draw a ring. You can draw an oval shaped ring with the circle tool, or you can make a teardrop shaped ring. (I discuss how to make oval shaped rings Here and teardrop shaped rings Here.)

(Please note that Inkscape may display unusual behavior when breaking apart teardrop shaped rings. Scroll to the bottom of this post to read more.)

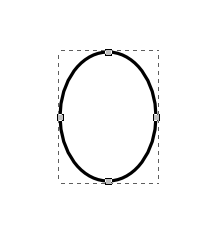
For the purpose of this tutorial, I will be using an oval shaped ring:


In order to break this ring apart, we will need to work with Nodes. With your ring selected, click on the "Edit paths by nodes" icon on your screen:


Now, on the top of the screen click on the icon shaped like an infinity symbol to convert your ring to a path. (This function can also be accessed through the main menu by clicking Path > Object to Path).

 
Your ring will display four nodes (or more if using a teardrop shape):


We can use these nodes to select a starting and an ending point for our split ring. (If you require additional nodes, scroll down and read my instructions for adding new nodes).

Click on a node where you would like your split ring to begin, then hold the Shift key on your keyboard and click on a node where you would like your split ring to end.


Your chosen nodes will be highlighted by blue boxes (mine are a bit hard to see). Make sure that only the starting and ending nodes have been highlighted. I noticed that it's easy to accidentally highlight too many nodes which can result in the ring being broken into 3 or more segments.


With the ring still selected, click on the icon at the top of the screen to "Break path at selected nodes"


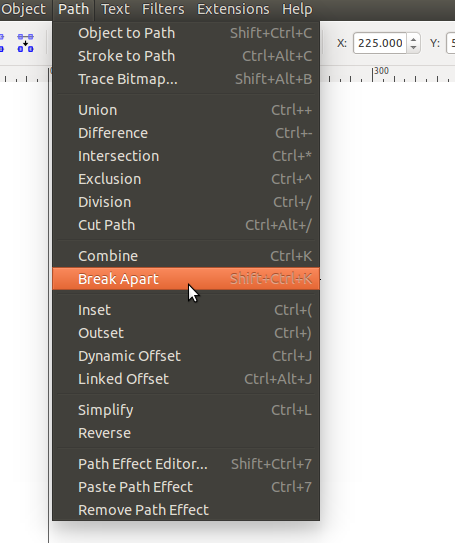
Then go to the menu at the top of the screen and click "Path > Break Apart"


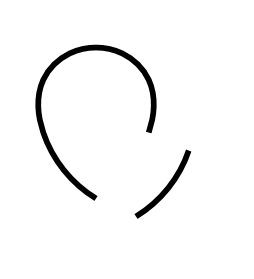
This action breaks our ring into two separate parts, which can be edited independently:


I've altered mine by making one segment red:


And the other segment blue:


My split ring has uneven segments, which can be used to represent a stitch count of 3/9. If you want an even split ring, you should select the topmost and bottommost nodes to break the ring down the middle.

Don't forget to group your ring before moving it, or it will move as two separate pieces. (Click here to read more about changing colors and grouping).


After you have finished drawing your split ring, I recommend saving it to a Template file so that you can copy/paste it in the future. This will save a lot of time that would otherwise be spent on drawing new rings.


Adding New Nodes:

Sometimes, you may find that you require extra nodes to be able to break apart your ring properly.

For example, if you are using the teardrop shaped ring that I have provided in my Free Diagramming Template, there isn't any node at the top.


This is fairly easy to remedy. First, make sure that you have followed the beginning steps in this post to convert your object into a path. Then, with the Node tool, click on the location where you would like to place a new node, and click the "Insert new nodes into selected segments" icon:


The new node may change the teardrop shape slightly, but not enough to be too noticeable:


With this new node, we can create an evenly split ring, using the same instructions that are outlined for the oval shaped ring:


Observations with Teardrop Shaped Rings:

While testing these instructions on various shapes, I noticed that teardrop shaped rings sometimes break into more than two segments. This only seems to happen if you use two side nodes to break the ring apart.


If you break the ring apart using the natural starting point (pictured below) and any other node, then everything works out fine.


There is one other method that I know of to draw split rings in Inkscape. It is limited, however, to rings drawn with the circle tool. I will post about it later on, as it may come in handy for those looking for a more simple, quick fix.

Thursday, January 15, 2015

Catching up

I've finally started Jane's Tat it and See (TIAS). Here is my progress up to Day 3:


This is my second time participating in the TIAS, my first was the sailboat:


It's too early to tell what this one will be. I was so far off in my guesses last year that I think I'll wait a bit to start guessing this time.

Onto other things: When I posted this bookmark, God's Kid asked to see the tassel closer up.


Here is a closer shot of the front and the back. This is done in size 80, and was my first time making the interlocking split rings, so it is lacking a bit in precision:


I had gotten the idea for the bookmark tail after reading muskaan's posts about interlocking split rings. If you scroll to the bottom of her post you will find links to Part 2 and Part 3 of the series.

I wanted to do a slightly different style so I followed these instructions found on Georgia Seitz's website.

Working with four shuttles can be frustrating. I found that my threads often tangled. Using a table (or maybe even a zippered bag) to hold the unused shuttles probably would have helped. I tried to keep all four shuttles on my lap and they tended to flail around.

For the tassel itself I used a technique posted by Rachael (xstchntat) on InTatters (now Craftree).


If you are a member of Craftree, you can click here to go to the forum topic where Rachael has linked to two videos. The first shows how to make a twisted cord and the second shows how to make the tassel. I don't want to link directly to the video because it goes into her Photobucket account, and that seems more of a private place than something like YouTube.

I still have some catching up to do on the Inkscape posts (I haven't forgotten about you Phyllis!) and I will get to them as soon as I can. I tend to get distracted easily by other projects and have been busy designing a Valentine Heart. I've posted a photo of the heart at the bottom of my Design Gallery page but won't be writing any more until I can properly diagram the pattern. I was thinking of adding it to my Etsy shop when it's ready.

Wednesday, January 7, 2015

Re-organizing blog pages

Just a heads up, I am re-organizing my blog pages so that all the tutorial posts appear on one page. I've also created a Design Gallery page where I will be adding images of new designs as I create them. If you see something that is not working, let me know.

The Design Tutorial Snowflake file will still show the old reference to the "iPad Design Tutorial" page until I get back to my other computer, which has the original Inkscape file for this pattern. For some reason, I never transferred the Inkscape file to my laptop.

Tuesday, January 6, 2015

This one's for me

I've completed my second Priscilla Bookmark (the first one was given away as a Christmas gift). This one is tatted in Lizbeth size 80 Rainbow Taffy, and I am keeping it for myself :)


Without the tassel, it works out to be 1.5 inches wide and 6 inches long, which fits well into a book.


I typically don't read much. Maybe this bookmark will get me to start.

I've posted a printable PDF of this pattern on my Free Patterns page. There has been a bug in Google Drive which blocks PDF files from being shared. It looks like it's fixed now, but just in case it's not, I have included two links to this pattern on my Free Patterns page. The bottom link will take you to the post about the bookmark, which contains a diagram for completing it.