Beginning in the corner makes it less fiddly when finishing the square, however, there is also a hidden benefit to starting in this position. Each time a triangle is completed (such as the one pictured above), I have two options. I can work clockwise and continue to make a larger triangle (and thus a larger magic square) or I can work counter clockwise (where the shuttles are placed) to finish the square.
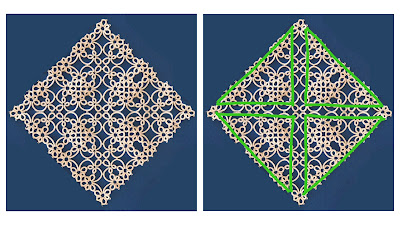
To understand this concept more clearly, picture each magic square as being composed of four triangles. The first, and smallest of the magic squares can be represented like this:
Tatting a slightly larger triangle (a combination of the bottom and rightmost triangles pictured above) creates a new magic square:
Using a simple collage app and drawing app on my iPad, I can get an idea of what each new magic square would look like. Option three, which is how I initially intended to make my magic square, looks like this:
To get really crazy, a fifth option (which I don't have the stamina to complete) would look like this:
All in all, I think this is a really neat experiment and I am excited to see what the finished square will look like.


15 comments:
That is awesome!!! :)
I'm impressed!
Wow I am impressed you are fantastic love everything you have studied and shown us your tatting is excellent too and I now see where I have and endless agenda with tatting💟🌹💟🌹💟😀
Lovely and much more interesting than the traditional magic square that I've started, I love your experiments
Superb !!! To carry on or to stop? seems to be the question, coz each option looks complete and nice :-)
Interesting post and I love the way you have worked on thus magic square, I do like the 5th option best no idea why but I do.
Well done on all your hard work
Wonderful work! Beautiful not only to look at, but as a puzzle... :-)
Your Option 4 square will really be quite big, won't it? Larger than a placemat - probably good to cover a small table...
I am so interested in your thinking! I, too, am loving the 4th option. Appears more airy.
Thanks Grace! I'm working with DMC size 50 thread so the square won't be as big as it seems in the photos. For Option 4, each side will be about 9 inches long. If I continued to Option 5, each side would be 13 inches long, and Option 6 (not pictured) would be about 18 inches per side. Not sure how that would translate if using size 20 thread though.
This is so interesting! I really am intrigued by the way the pattern works.
Fascinating how the "hypotenuse" of your smallest triangle is inside in one option and on the edge for the next option so that Option 2 & 4 have the same edge, different than options 1, 3, and 5. Love your pattern! Thank you so much for sharing.
Mama Martin
Wow. This is beautiful! I'd love to adapt this for a shawl (larger thread & just one triangle), so how far would this magic square concept have to go to make a shawl big enough to cover my shoulders?
Great idea Anitra! I'm not sure, but I imagine it would have to be many times larger than the sample I'm making, even if you use size 10 or 20 thread. The square I'm working on (see my November 4th blog post) has a diagonal measurement of only 12 inches in size 50 thread.
I guess you would just have to keep expanding the triangle, measuring it against your shoulders as you go to find a good stopping point.
Has it a copyright o con you share the pantera? I Would like to try it. Thanks and congratulations. It is absolutely beautifull
Thanks Alba Alicia! I'm still working on this pattern and several others that explore the triangle theme. When they are finished, I'm planning to add them to my Etsy shop with the option of purchasing either single patterns or the entire pattern pack (10+ patterns). I'll keep my blog updated with my latest progress.
Post a Comment