


Black and White:
If you are working with a black and white diagram, you may want to take a look at the variety of dashes that can be applied to your drawing. They can be found under the Fill and Stroke menu, which is accessible from the main menu under Object > Fill and Stroke.
On the Fill and Stroke menu, select the tab labeled "Stroke Style." Here you will see a section labeled "Dashes" which contains a number of different styles you can use. Make sure to have your chain selected for this menu to become active. You may also have to widen your Stroke Width to make everything more visible. I am using a width of 3 pixels.

Below, I've drawn a few chains (some with the circle tool and others with the Bezier tool) and set different dash styles to each one:

Color:
If you are working with color, the process will be a bit different. As far as I know, the current version of Inkscape does not support lines with multiple colors. So, we have to fake it by duplicating and overlapping two differently colored lines:
The first step to creating the above image is to draw a chain. You can use the circle tool, Bezier tool, or your own preferred method. Increase the Stroke Width so that your colors can be easily seen. I chose a width of 4 pixels, but anything in the 2 to 5 pixel range should be fine.
Change the line color (Shift + Click on your color palette) to one of the two colors you plan to use in your diagram. Although we can change the line color at any time, it is easier to do so now, before we overlap our chain with a duplication. I've changed my chain to red:

Next, duplicate this chain (Ctrl+D) but DO NOT move the duplication. We want the duplicated image to lay directly over top of our original, so that we can create the illusion of one line. Change the color of the Duplication to the second color you have chosen to use (in my case blue):

Now, with your Duplication still selected, open up the Fill and Stroke menu and go to the section labeled "Dashes" under the tab for Stroke Style. Choose the type of dash that you would like to use from the drop down menu:

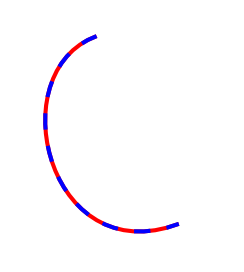
We can now see the red line emerge from underneath the blue line:

When you are happy with your result, don't forget to Group both lines (Ctrl+G) so that they can be moved and edited as one:

The same process can be performed on straight lines:

And on other shapes as well:

If you would like to change colors AFTER duplicating:
After duplicating, we have two lines, one directly on top of the other. Due to the overlap of lines, you will find that using the cursor tool only selects the line that lies on top. If you would like to change the color of the line that lies beneath, we have to use a workaround.
Let's take my example of the red and blue lock chain. In this case, the blue line lies on top of the red line. I know this because when the chain is Ungrouped, clicking on it will show blue in the lower left corner of my screen:

Even if I click on a red section of the chain, it will still display as blue in the lower left corner. This is because the red line is below the blue line, and inaccessible to the cursor.
Changing the blue line is easy. Simply select the chain (make sure it is ungrouped first!) and then Shift+Click on a color from the palette. I've changed mine to black:

Changing the red line is harder. To do so, we are going to have to temporarily break the image apart so that the red line can be selected. (Don't worry, it's easy to put back together). With your cursor, drag the top (dashed) line away:

Now, select the red line (or whatever line you had underneath) with your cursor:

And press Ctrl+Z on your keyboard to undo the move. This should NOT undo the selection of the red line. You can confirm this by looking in the lower left corner of your screen to see which color is displayed. My screen displays red, letting me know that the red line is still selected:

Now, changing colors is just as easy as it was with the blue line. All I have to do is hold Shift while selecting a color from the palette. I've chosen light blue:

Tada!
5 comments:
Robin, I just tried out the 1st part of this tut. Successful in making chains with dashes - pretty easy ! .... haven't tried the colours yet.
I might have missed it from your earlier tuts (if so, please ignore) - just one point to add : The chain needs to be selected for the stroke style to work.
I also noticed that if one does not thicken the curve/chain/stroke, then the dashes are not visible - you have mentioned that :-)
Very meticulous tut - the 2-colored dashed lines will require some working through & practice ... to much for a sleepy brain to handle at present ;-)
Oh, another observation/query. One cannot add colour to a dashed stroke ?! One has to have a Coloured stroke First, & then add the dashes ?
I think I need to go back to your earlier posts on colour .... will do it later.
Hi muskaan,
I'll go back in a bit and add those extra details that you mentioned. From what I remember, you can change color at any time, including to dashed lines.
What can get tricky is if you want to change the color of the line that lies underneath. The reason being, it is hard to select an object when it is overlapped by another object. So if you can choose a base color before duplicating, that would be best.
There is, however, at least one way to change the color of the underneath line after it has been overlapped. It involves temporarily moving the overlapping line down below it. Maybe later tonight I will add screenshots of how to do this.
Extra details have just been added, along with screenshots of how to change colors after duplication and setting dashes. I learned a new workaround for selecting objects that lie underneath other objects. It's much easier than using the Raise and Lower features on the Object menu. Check out the last part of the post and see if it works for you :)
My mind is boggled by your tutorials! So very thorough! This is the kind of software we only dreamed about in the past. But you're explanations are icing on the cake! Publisher has improved over the years (I finally have It again after a 3-year absence, this time on my new laptop). Serif Draw has some nice features but it's on my older laptop, and I haven't used it that much. Thanks again for all this work! If I install the software, I'll certainly refer to your excellent tutorial and 'tips'!
Thanks Kathy! I am learning a lot myself, from just taking the time to research possible solutions to questions that people have had. Also, Phyllis has been giving me some great tips which I hope to share in my next post about drawing split rings.
Post a Comment