


Phyllis sent me these instructions a few months ago (thank you Phyllis!) She has a tatting blog of her own, and if you'd like to check it out, you can do so by Clicking Here.
Update: I have found another method for creating split rings in two colors. If you have trouble with the instructions in this post, Click Here to try the alternate method.
The basic idea behind this method is to break a single shape into multiple line segments, so that each segment can be edited independently. By breaking a ring into two segments, we can color one segment red and the other blue (or colors of your choosing), to achieve the following results:

Let's get started.
To begin, you will need to draw a ring. You can draw an oval shaped ring with the circle tool, or you can make a teardrop shaped ring. (I discuss how to make oval shaped rings Here and teardrop shaped rings Here.)
(Please note that Inkscape may display unusual behavior when breaking apart teardrop shaped rings. Scroll to the bottom of this post to read more.)
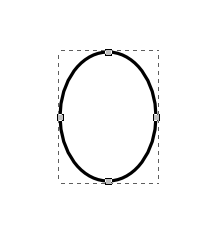
For the purpose of this tutorial, I will be using an oval shaped ring:

In order to break this ring apart, we will need to work with Nodes. With your ring selected, click on the "Edit paths by nodes" icon on your screen:

Now, on the top of the screen click on the icon shaped like an infinity symbol to convert your ring to a path. (This function can also be accessed through the main menu by clicking Path > Object to Path).

Your ring will display four nodes (or more if using a teardrop shape):
We can use these nodes to select a starting and an ending point for our split ring. (If you require additional nodes, scroll down and read my instructions for adding new nodes).
Click on a node where you would like your split ring to begin, then hold the Shift key on your keyboard and click on a node where you would like your split ring to end.

Your chosen nodes will be highlighted by blue boxes (mine are a bit hard to see). Make sure that only the starting and ending nodes have been highlighted. I noticed that it's easy to accidentally highlight too many nodes which can result in the ring being broken into 3 or more segments.

With the ring still selected, click on the icon at the top of the screen to "Break path at selected nodes"

Then go to the menu at the top of the screen and click "Path > Break Apart"
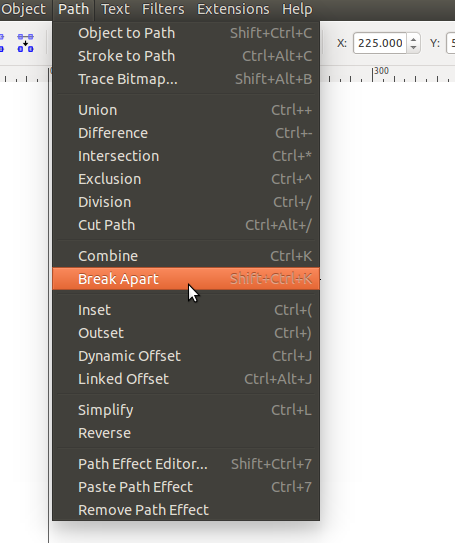
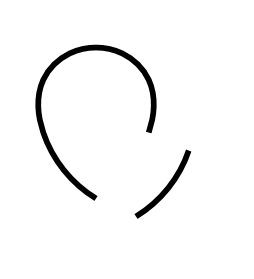
This action breaks our ring into two separate parts, which can be edited independently:

I've altered mine by making one segment red:

And the other segment blue:

My split ring has uneven segments, which can be used to represent a stitch count of 3/9. If you want an even split ring, you should select the topmost and bottommost nodes to break the ring down the middle.
Don't forget to group your ring before moving it, or it will move as two separate pieces. (Click here to read more about changing colors and grouping).

After you have finished drawing your split ring, I recommend saving it to a Template file so that you can copy/paste it in the future. This will save a lot of time that would otherwise be spent on drawing new rings.
Adding New Nodes:
Sometimes, you may find that you require extra nodes to be able to break apart your ring properly.
For example, if you are using the teardrop shaped ring that I have provided in my Free Diagramming Template, there isn't any node at the top.

This is fairly easy to remedy. First, make sure that you have followed the beginning steps in this post to convert your object into a path. Then, with the Node tool, click on the location where you would like to place a new node, and click the "Insert new nodes into selected segments" icon:


The new node may change the teardrop shape slightly, but not enough to be too noticeable:

With this new node, we can create an evenly split ring, using the same instructions that are outlined for the oval shaped ring:

Observations with Teardrop Shaped Rings:
While testing these instructions on various shapes, I noticed that teardrop shaped rings sometimes break into more than two segments. This only seems to happen if you use two side nodes to break the ring apart.


If you break the ring apart using the natural starting point (pictured below) and any other node, then everything works out fine.


There is one other method that I know of to draw split rings in Inkscape. It is limited, however, to rings drawn with the circle tool. I will post about it later on, as it may come in handy for those looking for a more simple, quick fix.
6 comments:
Thanks, again, Robin :-)
Another clear tutorial which I hope to put to good use ....
And the same method can be used for interlaced & interlocked rings, right ?!
Great tutorial! If I ever get into designing and diagramming, I know where to look for help!
Hmmm...you may have to ask Phyllis about that. She commented that she was able to use this method for interlocking chains. I haven't played around with it yet, but I'm sure you can use it for a lot of things (split chains for example).
Sorry for not getting back earlier. Been dealing with a family member in/out of hospital and finally getting my life back. Yes, you could use for interlocking chains/rings. Let me play and I will send info to Robin for a future tutorial.
Hi Phyllis . I will be looking forward to your & Robin's tuts on this. Thanks :-)
I tried my hand, before this tutorial was out. I used a simple white thick line to "break" the rings at the desired points. Since there were only 2 IRs, it was quick, easy & effective. For a braid, etc., I don't know whether that will work. Haven't had a chance to work on Inkscape for some time now.
Post a Comment